Monday, 25 April 2016
Bibliography
Kiang, J. (2015) 18 great films of gothic horror and romance to watch before ‘crimson peak’. Available at: http://blogs.indiewire.com/theplaylist/18-greatfilms-of-gothic-horror-and-romance-to-watch-before-crimson-peak-20151015 (Accessed: 15th February 2016)
Brookyngirl (2007) Why is Bram stoker’s Dracula considered gothic literature? Available at: http://www.enotes.com/homework-help/how-whybram-stoker-s-quot-dracula-quot-considered-14407 (Accessed: 15 February 2016).
Gothic horror (2014) Available at: http://tvtropes.org/pmwiki/pmwiki.php/Main/GothicHorror (Accessed: 21st February 2016).
Shelley, M. (2016) Popular gothic horror books. Available at: https://www.goodreads.com/shelf/show/gothic-horror (Accessed: 25th February).
The gothic (2014) Available at: http://www.bl.uk/romantics-andvictorians/themes/the-gothic (Accessed: 4th March 2016).
Universal studios Hollywood | the walking dead: Wolves not far (no date) Available at: http://www.halloweenhorrornights.com/hollywood/2015/att-thewalking-dead.php (Accessed: 14th March 2016).
Eddy, C. (2016) A walking dead producer will adapt the horror Podcast lore for TV. Available at: http://io9.gizmodo.com/a-walking-dead-producer-will-adaptthe-horror-podcast-l-1772274018 (Accessed: 25th March 2016).
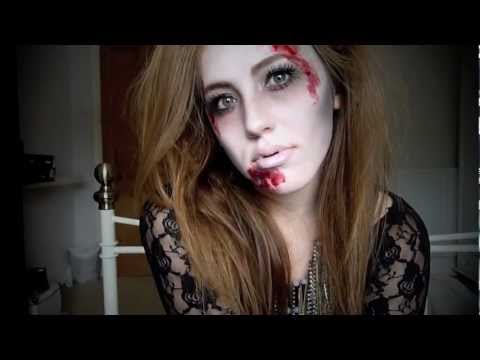
News, M. (2016) Horror make-up. Available at: https://uk.pinterest.com/vampirefreaks/horror-make-up/ (Accessed: 29th March 2016).
Gothic fashion (2016) in Wikipedia. Available at: https://en.wikipedia.org/wiki/Gothic_fashion (Accessed: 29th March 2016).
Elements of the gothic novel (2010) Available at: http://www.virtualsalt.com/gothic.htm (Accessed: 2nd April 2016).
Thursday, 21 April 2016
Practical lesson - Black eye
Technique:
- Have image of a real black eye for guidance
- Using a 'bruise wheel', and small make-up brushes, apply darker colours to the inner corner of the eye socket, and follow the socket round
- Use lighter purple, red and yellow colours on the outside of the eye
- Red eye pencil can make the eye appear sore
- Red eye drops can make eyes appear bloodshot
- Dab on Vaseline if the bruise looks a little matte, to add a bit of shine
Black eye:-


Equipment needed:-
-Round end palette knife
-Small makeup brushed
-Powder brush
-Soft larger brush to stipple foundation over wound
-Black stipple sponges
-Hairdryer
-Cotton buds
-Hairpins
Health and safety:-
-Test all products on client's skin first to check for allergies
-Wash hands
-Close lids once used products
-Client's eyes always shut
Thursday, 31 March 2016
Make up and Hair ideas for Quentin
Quentin has been hiding from the others for a long time he has a few scratches and scars from running and being attacked from the zombies he has very pale skin, his health is not very good due to the lack of food and water. His hair is not very neat and styled he lets it stay messy


Hair ideas for Claudia
Claudia is insane and a vampire, she is feeling like an outcast from the others, she does not care about her appearance and is more concerned about getting food, for her hairstyle I wanted to make something messy and carefree


Make up ideas for Claudia
I want to keep it simple for Claudia's make up, I want her to have very pale skin, big under eye circles, her skin looking almost blue and dead, as well as some blood and a few scars, I was researching few images to give me more ideas of how I want my character to look.

Claudia, Quentin - The Walking Dead
The Walking Dead
- Main character sheriff who woken up from the coma to find out the world is being rules by zombies
- The remaining people struggling to adapt to the world with zombies, they are afraid of the other people who are even more dangerous than them
- The first season revolves around quit and nice countryside
- Very intriguing, there is constant fear of being zombified, or killed by others
- The apocalypse and zombies coming to life appears very realistic and could happen in real life
Quentin
- Quentin is one of the survivors from the apocalypse and is hiding constantly from the others, he is always with Claudia and has never been seen by others due to his fear of being attacked and becoming a zombie
- He is always in the countryside away from the others, in a small house that looks like a shed, he is becoming pessimistic and hopeless that he wont be able to survive as a human, however he has an urge to go outside and socialize with others
- He is wearing slightly ripped and dirty clothes because after apocalypse he did not go outside, however Claudia's imagination, makes him appear the way she wants him to look, Quentin has a few scars and scratches from running away from the other zombies, he looks very tasty to Claudia and soon may become her meal
Key word - Disguise
- Quintin is never seen by anyone apart from Claudia, he is always with her hiding from others
- I was researching a lot of movies, TV series to find out more about other characters that always seemed to be hiding and using a disguise from other one of them is 'Vampire Diaries'
- Quintin can never be seen by others only Claudia in her imagination, so disguise is a perfect word to describe him because of his tendency to hide and not be seen by others.
Claudia
- Claudia is a zombie outcast, she does not seem to get along with the other zombies after the apocalypse the only friend that she has is Quentin, she calls him her boyfriend however she can not socialize with others so she slowly becomes more insane
- Claudia looks like insane hospital patient but as a zombie, her hair is messy and because shes an outcast she stops bothering about her appearance and is only concerned what Quentin thinks of her
- She is becoming more weak and hungry as she is unable to feed on anyone because she never goes outside and is feeling depressed
- Claudia is slowly starting to think that her only food can be Quentin
Key word - Black shadow
- She is always alone in her house, hated by everyone apart from Quentin, she feels like the outcast and develops depression
- She only goes out in the nights to see if she can find herself food, she is too afraid to go outside in the day because she feels like she is being judged by others
- She is very quite girl, but has evil side to her that will be discovered as her patience of being left out will come to an end
Wednesday, 30 March 2016
Recreating the make-up look
To recreate this look I started by applying Illamasqua foundation from the center of the face working outwards, because I wanted more of a luminous finish rather than matte as show in the picture I did not apply any powder on top of the foundation. For the cheeks I used kryolan blush palette in colour red, for the lips I used Kryolan super-colour in red and gold, placing the colour red in the middle of the lips and a little bit of gold colour on the cupids bow. Moving on to the eyes I started by applying illamasqua black eye shadow in the crease of the eye as well as under and blended it out. for the inner corner and the whole lid I used super colour in gold. Under the eyes I lightly dusted some shimmer from the Illamsqua pigment to create that very dewy look. Lastly I coated eye lashes with white supercolour using disposable wand and for the eye brows I used light brown shade from the palette.


Practical lesson - Wounds
Products needed:-
- Gelatine mould
- Adhesive
- Pro clean
- Kryolan super-colour
- Kryolan foundation palette
- Baby powder
- Witch-hazel
Equipment needed:-
- Scissors
- Cotton buds
- Cotton pads
Technique:-
- Cut around the wound to avoid harsh edges
- Apply adhesive with cotton pad and wait for it to dry, it should still be tacky then apply the wound onto it
- Use witch-hazel to smooth out harsh edges
- Apply powder to get rid of any tackiness
- Using foundation, super-colour or fake blood, paint over the wound to make it look realistic


Continuity assesment part 2


Continuity assessment part 1
I arrived in time for my assessment, had plenty of time to prepare myself and get all the right equipment out, as well as prepare my model by covering the clothes. I started by cleansing the skin using cotton pads, as well as toning and moisturizing after. For the face base I used Illamasqua foundation palette in the lightest shade, I applied the foundation starting from the center of the face working outwards using flat foundation brush. After I was finished applying foundation I used Illamasqua powder and lightly applied it all over the face using powder puff. For the cheeks I used Kryolan blush palette in the red shade, I applied it using stippling brush very lightly. For the lips I used fake blood to give me the stain effect so the lips look naturally rosy. Moving on to the eye area I used black Illamasqua eye shadow under the eyes drawing fine lines with flat eye shadow brush also blending them out so it looks like veins/under eye circles. Lastly for the eyelashes and eye brows I used Kryolan super colour in back and applied it using disposable mascara wand.
For the hair style I started by teasing the top sections of the hair to give me more volume and spraying the with the hairspray to hold. I grabbed the side sections and clipped them from the sides, hiding the clips under the top section of the hair. For the rest of the hair texture I sprayed a lot of hairspray and tried to create waves and messy texture.
Overall I am happy with the way the make up and hair turned out, I was very nervous that I will run out of time however I was able to finish on time and take photographs.


Hair design ideas for my character
I started by looking more in depth about Victorian hair styles, for my character I wanted to incorporate curls/waves but not make it ''pretty'' or ''neat'' as Victorian hairstyles usually are because I wanted to show more of a vampire side of her, that she does not care how her hair looks, so I wanted it to look almost messy. My model has short hair so there are not many options when it comes to complicated hairstyles.


I tried to create a Victorian hairstyle, to see is I could use it for my character. I started by applying heated rollers onto the doll's hair, Once the rollers cooled off I took them all out and started with the bottom section of the hair, I created a curl upwards to give me that twisted pinup look. After I done that I started working with the middle portion of the hair by brushing out the curls to give me volume aswell as teasing the hair slightly and then clipping it down towards the bottom of the hair. With the from section of the hair I gently clipped the curls away from the face, did not want to brush them out as I wanted a very tight defined curl.


I tried to create a Victorian hairstyle, to see is I could use it for my character. I started by applying heated rollers onto the doll's hair, Once the rollers cooled off I took them all out and started with the bottom section of the hair, I created a curl upwards to give me that twisted pinup look. After I done that I started working with the middle portion of the hair by brushing out the curls to give me volume aswell as teasing the hair slightly and then clipping it down towards the bottom of the hair. With the from section of the hair I gently clipped the curls away from the face, did not want to brush them out as I wanted a very tight defined curl.


Tuesday, 29 March 2016
Victorian era beauty ideals
Victorian era women idolized pale skin, it was a sign of nobility, sign of wealth, because they did not have to work outside and burn their skin, they also liked to paint their face with zinc oxide and white powder to give them even whiter complexion. Not all women liked to apply zinc on their skin so they simply avoided the sun to prevent the skin from darkening itself. When they needed to go outdoors, women would carry parasols to protect their skin from the sun. Some even drank vinegar because they thought they will prevent tan that way. Not only women wanted to look deadly pale, they wanted to look almost translucent, they used to paint fine blue lines on their bodies so it looks that their skin is so pale and thin, not only that they wanted to emphasizing their dark circles by applying red rouge to their lips and cheeks, however this trend did not last for a long time it was only a short period of time in this era. To prevent their skin from looking oily they just dusted some powder on top, not too much they did not want to look powdery only natural
When it came to cosmetics women could not be seen buying them, however they used to do it secretly, also only picking their skin color shades to make them look as natural as possible but slightly better. Their eye shadows were made with lead and antimony sulfide, lipsticks with mercuric sulfide, blushes only using beet juice. They wanted the make up to look settle nothing too extreme the beauty ideal was to look as natural as possible almost like you not wearing any make up at all. When it came to skincare all face creams were made using natural products such as almond oil and waxes.


In the Victorian era, the hair was extremely important, it was the woman's beauty feature, the only time the women would cut their hair would only be when they are ill. Buns as well as curls were very popular especially curs at the sides and back and bun being higher up usually plaited as well. To make their hair more smooth and sleek women used any type of oil.
Victorian hair
Early Victorian era (1980s) hair usually consisted of spiral curls, half hair up with middle parting, and hair usually being only shoulder length

During and after the civil war plaits became very popular as well as buns. Usually the the hair would be plaited first and swirled around to create a bun, very often the bun would either be very low or very high of the head. The sides would either also be plaited and connected with a bun or left loosely with very tight curls

Later on in 1870's the hairstyles started to slightly change and the texture and shape of the curls were different (not the usual spiral ones) also the buns started to go out of fashion and women liked to wear their hair down with front of the hair being clipped back

In the classroom I tried to create a Victorian hairstyle myself. I wanted to incorporate bun with curls as it seemed like it was a staple of Victorian era for a long time. I started by sectioning the hair near the hair line all around the head and clipping back the hair that was not sectioned along the hairline. I grabbed a curling iron and started to curl the hair in very small sections to create those tight curls. Once I was finished with the curls I grabbed the bottom section of the hair and twisted it while grabbing the remaining hair and creating a ponytail at the top of the hair. I created a plait from the ponytail and twisted it around the bobble so it looks like a neat bun


During and after the civil war plaits became very popular as well as buns. Usually the the hair would be plaited first and swirled around to create a bun, very often the bun would either be very low or very high of the head. The sides would either also be plaited and connected with a bun or left loosely with very tight curls
Later on in 1870's the hairstyles started to slightly change and the texture and shape of the curls were different (not the usual spiral ones) also the buns started to go out of fashion and women liked to wear their hair down with front of the hair being clipped back
In the classroom I tried to create a Victorian hairstyle myself. I wanted to incorporate bun with curls as it seemed like it was a staple of Victorian era for a long time. I started by sectioning the hair near the hair line all around the head and clipping back the hair that was not sectioned along the hairline. I grabbed a curling iron and started to curl the hair in very small sections to create those tight curls. Once I was finished with the curls I grabbed the bottom section of the hair and twisted it while grabbing the remaining hair and creating a ponytail at the top of the hair. I created a plait from the ponytail and twisted it around the bobble so it looks like a neat bun


Practical lesson - Wrinkles
Products used:-
- Liquid latex
- Acetone
- Barrier cream
- Old age stipple
Equipment needed:-
- Stipple sponge
- Orange stipple sponge
- Powder brush
Health and Safety:-
- Wash hands
- Test if the model and you are allergic to latex
- Cover the models clothes for protection
Technique used:-
- Wash hands before applying any of the products
- Apply a small amount of latex on the skin to see if there is any allergic reaction
- Apply barrier cream and rub it into the skin
- Eye should always be closed at all time especially while applying latex
- Stretch the skin before applying latex, once its stretch dab on the latex
-Use the hairdryer to speed up the drying process (skin should still be held stretched until its completely dry)
- When the latex is dry let go of the skin and slightly squeeze it together to create deeper more defined wrinkles
- Add more layers for more definition and higher effect of the wrinkles
- Using acetone clean up the edges so they not harsh
- Powder at the end so there is no shine
- Add any colour on top if necessary
( Latex can be removed with warm water )
Before

After


Model's skin consultation notes
Skin type:- dry to normal (skin is not oily which means less chance of blemishes which helps with continuity)
Skin sensitivity:- no bad reaction to any of the make up/ hair products used
Products used for the make up look:-
- Illamasqua skin base foundation (white)
- Kryolan blush palette (red colour for the cheeks)
- Kryolan super colour palette (black colour for eyelashes and eye brows)
- Fake blood (as a lip stain)
- Illamasqua black eye shadow (for the under eyes)
- Illamasqua powder (to set the foundation so its not wet/sticky)
Products used for the hair look:-
- Teasing brush
- Hairspray
- A few hair clips
Practice on my model - Lucy from 'Dracula'
Make up technique:-
- I started by covering any blemishes that she may have so it wont interfere with continuity
- I applied Illamasqua white foundation base to create a very pale complexion, then I applied powder using a puff to make sure the face is not sticky and set.
- Using stippling brush I used red blush colour form Kryolan blush palette to give slightly rosy cheeks
- To create a red stain effect on the lips I applied fake blood using a cotton bud
- For the under eye make up, I used black Illamasqua pigment shadow with rounded eye shadow brush for better blending and started applying the colour to create black streaks and then blended them together
- I used black super colour and disposable mascara wands to apply it to the eye lashes and for the eyebrows I used the same black colour from super colour palette and brushed into the eyebrow for more definition and contrast between pale skin
Hair technique:-
- I sectioned the top layers of the hair and started teasing them for more volume
- Using a hairspray I sprayed the hair to give me more control and longer lasting effect
-Using hair clips I clipped back both sides back for a sleek look


Practical lesson - Dirt/Teeth
Products needed:-
- Super colour palette
- Surgical spirit
- Kryolan colour sprays
-Kryolan tooth enamel
-Fuller's earth and water
-Moisturizer
Equipment needed:-
- Cotton buds
-Hairdryer
Technique (for dirty hands):-
- Start by mixing Fuller's earth with water to create thick mixture, and apply it all over the hands
- Using warm setting hairdryer, dry out all the mixture thats been applied onto the hands
- Lastly spray some kryolan colour spray to create more intense colour of dirt ( I used the colour brown)


Technique (for rotten teeth):-
- Using a cotton bud, dry the teeth that you will be applying the tooth enamel on to so it sticks better
- Once they are dry, apply tooth enamel using a cotton bud, do not forget cover the edges of the teeth and get close to the gums
- To remove the tooth enamel just dip cotton bud into the surgical spirit and gently swipe away the product


Practical lesson - Sweat/Fever
Products needed:-
- Super colour
- Glycerin
- Eye lash glue
- Eye drops
Equipment needed:-
- Sponge wedges
- Flicking brushes
- Make-up brushes
Health and Safety:-
- Wash hands
- Cover the model to protect clothes
- Be careful around the eye while applying alcohol, it can irritate them, always keep them shut
Technique:-
- If the model has any blemishes, cover them up using concealer, due to continuity the blemishes may disappear in a few days and the make up wont look the same the next time
- Apply moisturizer to give some shine to the face
- Mix red super colour with IPA to make it more sheer
- Dab into the skin using brushes (dont sweep), blend it out using fingers for more realistic look
- Do not forget to add colour to neck, ears and neck to make the fever more realistic because naturally fever does not have harsh edges and it covers not only the face but other areas of the body too
- Apply eye lash glue on to the lips to give more of a dry look, also apply some of the red super colour to make the lips look more sore
- Use powder to give extra dryeness for the lips
- Using make up sponge apply glycerin in dabbing motion to give the appearance of sweat, its much better than water as it does not run down so quickly
- Using eye drops, squeeze a small amount into the inner corner of the eye to give watery look of the eyes


Subscribe to:
Comments (Atom)